AWS Terraform and Wireguard - part two
In the previous post we installed Terraform and used it to create a VPC in AWS, subnets, instances and all the necessary elements for a lab with Wireguard.
In this post we'll install and configure a Wireguard server, a remote client and use it to access an EC2 instance in a private subnet.
Wireguard
The EC2 instance we installed to host Wireguard has a public IP address.
We can get its IP using AWS CLI
aws ec2 describe-network-interfaces --query NetworkInterfaces[*].PrivateIpAddresses[*].Association.PublicIp
I described how to install aws cli in my previous post
If AWS CLI is not available, we can use the AWS console. You can find it in the details of the wireguard EC2 instance, under IPv4 Public IP.
Login to Wireguard server via ssh. Remember that key authentication is enabled with the key pair already configured in AWS.
ssh ubuntu@1.2.3.4
Now we install Wireguard on the server
sudo add-apt-repository -y ppa:wireguard/wireguard
sudo apt update
sudo apt install -y wireguard
Wireguard uses private and public keys for encryption.
We start creating a folder to store the keys
sudo mkdir /etc/wireguard/keys
sudo su -
cd /etc/wireguard/keys
umask 077
And then create the keys
wg genkey | tee privatekey | wg pubkey > publickey
The private key of the server must not be shared
Now we create the server config
nano /etc/wireguard/wg0.conf
With this content
[Interface]
PrivateKey = <server private key>
Address = 10.99.0.1/24
ListenPort = 51820
We are ready to start the wg0 interface
wg-quick up wg0
sudo systemctl enable wg-quick@wg0
Note the port 51820 of the server, it must match the port defined in the Security Group in our VPC
Now we can install Wireguard on the client.
After the client installation, collect its public key. We need the key to add it to the server using this command
sudo wg set wg0 peer insertClientPublicKeyHere persistent-keepalive 25 allowed-ips 10.99.0.100/32
Now we can save the configuration of Wireguard so they'll survive a reboot of the server. Remember to do that after any change of the configuration, including adding new clients
sudo su -
wg showconf wg0 > /etc/wireguard/wg0.conf
wg setconf wg0 /etc/wireguard/wg0.conf
The server will accept the connections from the client and will only accept traffic originated from the IP address 10.99.0.100.
To configure the client we need two pieces of information
- the server public IP and port
- the server public key
The public key is on the server. This key can and must be shared to permit the connection of the clients.
We get the key executing
cat /etc/wireguard/keys/publickey
The public IP of the server is the one we used to access it via ssh. We can get it via CLI running
curl ifconfig.me
Then we configure the client with the public IP and public Key of the server as shown in the screenshot
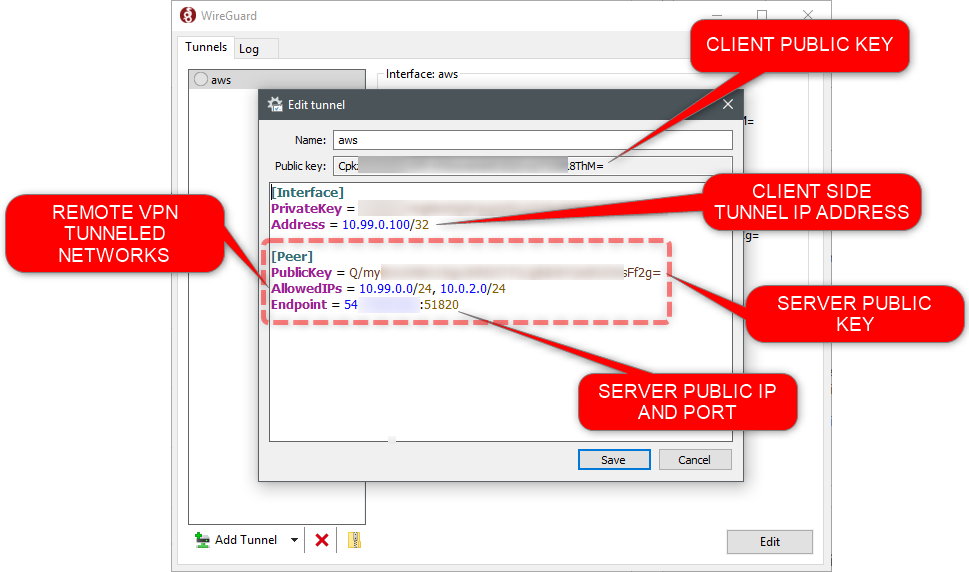
Raw content for copy/paste
[Interface]
PrivateKey = 09876543212098765432109876543212098765432210
Address = 10.99.0.100/32

[Peer]
PublicKey = 09876543212098765432109876543212098765432210
AllowedIPs = 10.99.0.0/24, 10.0.2.0/24
Endpoint = 1.2.3.4:51820
Now we can activate the tunnel on the client. We should be able to ping the wg0 interface of the server 10.99.0.1 but not the client 10.2.0.10 yet.
Enable IP routing on the server
To reach the client with IP 10.2.0.10 we need to enable IP forwarding on the Wireguard server
sysctl -w net.ipv4.ip_forward=1
To permanently enable IP routing add to /etc/sysctl.conf this line
net.ipv4.ip_forward = 1
And run
sysctl -p
Notice that in our Terraform template we disabled source/destination check for the Wireguard EC2 instance to permit IP forwarding in the VPC
source_dest_check = false
Almost there
We can now reach the internal EC2 instances through the VPN active in the public EC2 instance running Wireguard.
Ping 10.0.2.10 to confirm it works.
We can ssh the client
ssh ubuntu@10.0.2.10
and run a packet capture on the client to see the ping going in and out
sudo tcpdump -i eth0 net 10.99.0.0/24 and icmp
The original IP of the VPN client is maintained, this can be useful for logging and troubleshooting.
If you're interested to measure the performances, iperf can be the right tool for that.
Terraform destroy
When we're done with the lab we must rember to run
terraform destroy
to remove all the resources created in AWS and avoid unexpected billing.
Wrap up
At the end of this post I run the same Terraform configuration using Terraform Cloud, reading the files form a GitHub private repository, with the same results. That is useful if you prefer not to install Terraform or to try something different.
Once again I experienced how a GUI can be easy for quick tasks or to create small infrastructures. For versioning, an approval workflow and anything that contains more than a few objects, IaC is the best way to do it (so far).
Writing a Terraform declarative configuration file requires more thinking about the purpose of every object. Working on a GUI feels shallow, but maybe it's just me.
The Wireguard configuration for this post was very simple but it's awesome to have a working setup with just a few commands. Wireguard can be used to create AWS Transit VPC design, but it still doesn't work with AWS VPN. I'd not be suprised see Wireguard integrated in AWS in the future.
That's it! Hope you enjoyed this post.