AWS Terraform and Wireguard - part one
In my last post I worked with AWS CLI and Cloudformation to create a simple VPC and find a configuration drift.
In this post I'll show you how to build a VPC in AWS with all the elements necessary to lab Wireguard. We'll use Terraform to automate the creation of the VPC.
Prerequisites
To complete all the labs in this post you need an AWS account, an EC2 key pair, basic Linux skills, and AWS CLI optionally.
The plan
Terraform is an IaC tool that supports AWS and many other providers. For some uses it can be an alternative to AWS Cloudformation.
Wireguard is a new-ish VPN software that will be merged in the Linux kernel soon. It is widely appreciated for its peformances and easy to configure.
Terraform
The first step of our journey is the installation of Terraform.
We can use WSL on my Windows 10 or any flavour of Linux.
Installation is straightforward
wget https://releases.hashicorp.com/terraform/0.12.24/terraform_0.12.24_linux_amd64.zip
unzip terraform_0.12.24_linux_amd64.zip
mkdir ~/bin
mv terraform ~/bin
Avoid using snapcraft to install Terraform, the release is v0.11.11, we'll use v0.12 that has a different syntax.
We can verify the installation running
terraform version
Expected output
# Terraform v0.12.24
Creating a VPC with Terraform
The creation of the VPC and all the necessary elements requires some AWS skills. I will not discuss in detail the details of how AWS VPC works here. For anyone interested the topics are included in the AWS Certified Advanced Networking - Specialty training.
We start creating a Terraform configuration named awswire.tf. This file will contain the definition of the AWS infrastructure.
Another file named variables.tf will provide all the variables and their values.
I advise to keep code and variables in separate files for reusability, readability and to avoid sharing private information/credentials by mistake.
The file awswire.tf will include
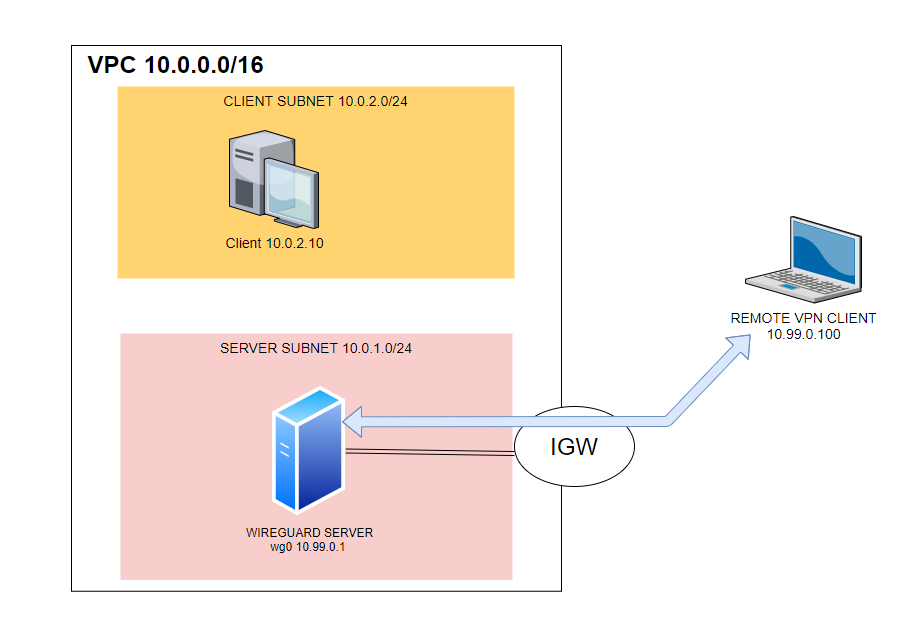
- a VPC with its CIDR
- an EC2 instance for the Wireguard server
- an EC2 instance for the internal client
- a public subnet for the Wireguard server
- a private subnet for the internal client
- an internet gateway (IGW) to provide Internet access to the server
- a default route for the public subnet pointing to the IGW
- a custom route table for the client: the client will use the Wireguard server to reach the VPN clients
- a security group (stateful firewall) to permit traffic to the server; ssh and udp 51820 will be permitted
- a security group to permit access to the AWS client from the remote VPN clients
Hand-made diagram:
The files are long and inlcuded comments for all the sections to make them readable. They are available in my GitHub account.
This is the part that creates the VPC
resource "aws_vpc" "default" {
  cidr_block = var.vpc_subnet
  tags = {
    Name = "wireguard"
  }
}
This creates the private subnet
# private subnet for internal instances
resource "aws_subnet" "private" {
  vpc_id  = aws_vpc.default.id
  cidr_block  = var.private_subnet
  map_public_ip_on_launch = false
  tags = {
    Name = "private"
  }
}
You got the idea. All the details are in the docs about the AWS Provider.
Clone the repository
git clone https://github.com/routetonull/terrawire.git
cd terrawire
Edit variables.tf with your AWS credentials and favorite region
provider "aws" {
  region     = "eu-west-1"
  access_key = "01234567890"
  secret_key = "012345678900123456789001234567890"
}
Now we can initialize Terraform
terraform init
Output
Initializing the backend...

Initializing provider plugins...
- Checking for available provider plugins...
- Downloading plugin for provider "aws" (hashicorp/aws) 2.57.0...

The following providers do not have any version constraints in  configuration,
so the latest version was installed.

To prevent automatic upgrades to new major versions that may contain    breaking
changes, it is recommended to add version = "..." constraints to the
corresponding provider blocks in configuration, with the constraint strings
suggested below.

* provider.aws: version = "~> 2.57"
Validate the configuration
terraform validate
Output
Success! The configuration is valid.
Verify the changes that will be applied running
terraform plan
Output
<snip>

Plan: 12 to add, 0 to change, 0 to destroy.

</snip>
Verify you're working in a test AWS account to avoid any impact in a production infrastructure.
And finally we can run Terraform to create the VPC and all the objects
terraform apply
See it in action
That's it!
Now we can login to AWS Console to verify the results or use AWS CLI, using the commands below to start
aws ec2 describe-vpcs
aws ec2 describe-subnets
aws ec2 describe-internet-gateways
aws ec2 describe-instances
aws ec2 describe-route-tables
aws ec2 describe-security-groups
Terraform destroy
When we're done with the lab we must rember to run
terraform destroy
to remove all the resources created in AWS and avoid unexpected billing.
Alternate config: use env vars to provide AWS credentials to Terraform
If you prefer to use env vars to store AWS credentials for Terraform, instead of using variables.tf, create a new file named ~/aws.export.env and edit with your credentials and region
export AWS_ACCESS_KEY_ID=1234567890
export AWS_SECRET_ACCESS_KEY=123456789012345678901234567890
export AWS_DEFAULT_REGION=eu-west-1
Assign exec permission to the file
chmod +x ~/aws.export.env
And activate it running
source ~/aws.export.env
This command mut be run again every time a new terminal session is created, or after a reboot. Add the same lines in ~/.bashrc if you want to set the env vars permanently.
Last step: remove the provider section in variables.tf, it is not necessary anymore
provider "aws" {
  region = "eu-west-1"
  access_key = "1234567890"
  secret_key = "12345678901234567890"
}
Next post: Wireguard
We're done with part one of this post. The VPC is ready to use.
Stay tuned for part two where we'll install and configure Wireguard to provide a secure access to the private EC2 instances in AWS.